KE2 Remote Display Manual: A Comprehensive Guide
This manual details the KE2 remote display system, enabling remote viewing of controllers via internet connection and KE2 SmartAccess․
Alerts can be received via email or text․
KE2 Therm Solutions offers innovative remote monitoring solutions for refrigerated systems, leveraging the power of the KE2 SmartAccess platform․ This system allows users to remotely view and manage their controllers from virtually any location with internet connectivity – be it home, office, or elsewhere․ The core benefit lies in proactive monitoring, enabling timely responses to temperature fluctuations and potential system issues․
With KE2 remote display systems, users gain access to critical data, including room temperature and system status, directly through the KE2 Combo Display or via remote access․ This capability is particularly valuable for maintaining the integrity of temperature-sensitive goods and ensuring operational efficiency․ The system supports pairing with one or two KE2 Evap OEM controllers․
Understanding KE2 SmartAccess and Remote Viewing
KE2 SmartAccess is the gateway to remote control and monitoring of your refrigeration systems․ When enabled during controller setup, and connected to the internet, it unlocks the ability to view controller data from any location․ This feature provides peace of mind and allows for swift intervention if issues arise․
Remote viewing extends beyond simple temperature readings; users can access setpoints, variables, and even manual control modes․ Furthermore, KE2 SmartAccess facilitates proactive alerts via email or text, notifying users of critical events․ The system’s architecture supports communication with one Logitemp controller or two paired controllers, enhancing overall system visibility․
Benefits of Remote Monitoring for Refrigerated Solutions
Remote monitoring with KE2 SmartAccess delivers significant advantages for refrigerated solutions․ Immediate notification of temperature deviations via email or text alerts minimizes potential spoilage and financial losses․ Proactive intervention, enabled by remote access to setpoints and variables, optimizes system performance and extends equipment lifespan․
This capability reduces the need for frequent on-site visits, saving time and resources․ Whether at home, work, or elsewhere with internet access, users maintain constant oversight․ The KE2 system empowers informed decision-making, ensuring product integrity and operational efficiency within refrigerated environments․

Components of a KE2 Remote Display Setup
A KE2 remote display setup includes KE2 Evap OEM controllers, the KE2 Combo Display (functioning as a remote interface), and necessary wiring for communication․
KE2 Evap OEM Controllers: The Core of the System
KE2 Evap OEM controllers are fundamental to the remote display system, providing core functionality and data․ Most ship with the KE2 Basic Display initially․ During setup, the controller prompts for refrigerant type, displaying 404 (R-404a) as a default, allowing selection from a list on page 12 of the manual․
Crucially, the controller also asks to enable or disable KE2 SmartAccess, unlocking remote monitoring capabilities․ These controllers manage refrigerated solutions and, when paired with KE2 SmartAccess and an internet connection, allow viewing from any location․ They are the central point for setpoint adjustments and system status monitoring․
KE2 Combo Display: Features and Functionality
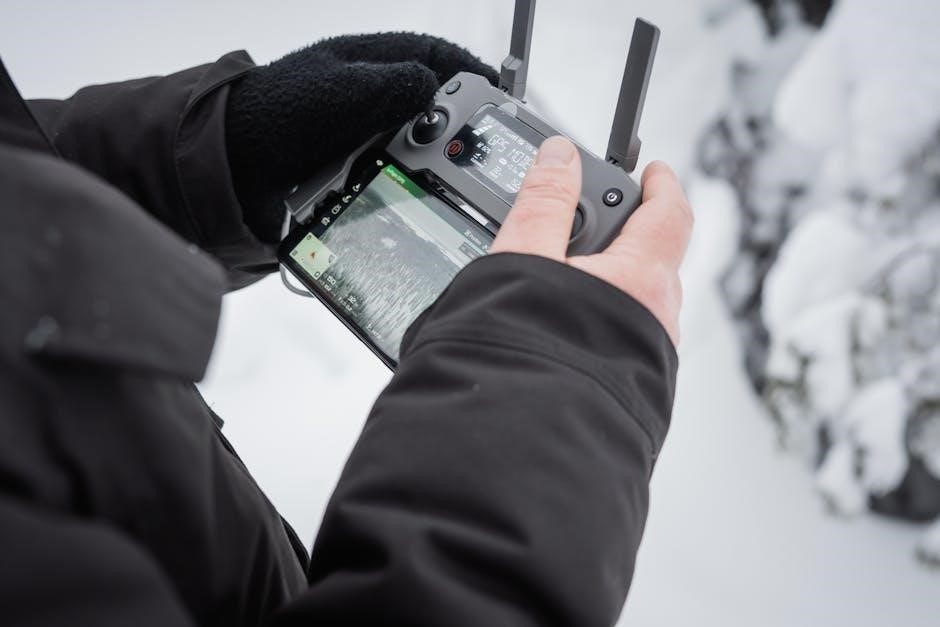
The KE2 Combo Display is a versatile interface, functioning as a temperature display, lighting control, panic alarm, door controller, and temperature alarm․ It can operate stand-alone or connect to one or two KE2 Evap OEM controllers, extending its capabilities․
When linked to controllers, it acts as a remote display – up to 1,000 ft with correct wiring – granting access to setpoints, variables, and manual control modes․ The Home Page displays room temperature and system status, accommodating one or two Logitemp controllers․ It provides a comprehensive overview and control point for refrigerated systems․
Wiring Requirements for Remote Display (Up to 1,000 ft)
Establishing a remote display connection, up to 1,000 feet, necessitates proper wiring techniques․ The KE2 Combo Display functions as a remote interface when connected to KE2 Evap OEM controllers․ Ensure appropriate gauge wiring is utilized to minimize signal degradation over extended distances․
Consult the KE2 documentation for specific wiring diagrams and recommendations․ Proper grounding and shielding are crucial for reliable communication; Adhering to these guidelines guarantees optimal performance and prevents interference, enabling seamless remote monitoring and control of your refrigerated solutions․

Setting Up KE2 SmartAccess
KE2 SmartAccess enables remote controller viewing with an internet connection․ During controller setup, ensure it’s enabled to receive email or text alerts․
Enabling KE2 SmartAccess During Controller Setup
During the initial controller setup process, a crucial step involves configuring KE2 SmartAccess․ The controller will prompt you to select whether to enable or disable this feature․ Selecting “ENABLED” is essential for unlocking remote monitoring and control capabilities․ This allows access to the controller’s functions from any location with an internet connection․
Remember to press and hold ENTER after making your selection to confirm․ Disabling SmartAccess will prevent remote access and alert notifications․ Properly enabling this feature is the foundation for utilizing the full potential of the KE2 remote display system, ensuring convenient and proactive refrigerated solutions management․
Establishing an Internet Connection for Remote Access
To utilize KE2 SmartAccess and remote viewing, a stable internet connection is paramount․ The controller requires connectivity to transmit data and receive commands․ Ensure your network meets the system’s requirements for a secure and reliable link․ Verify the controller is within range of your Wi-Fi network or connected via Ethernet․
Once connected, the controller can be accessed remotely from home, work, or any location with internet access․ Proper network configuration is vital for seamless operation․ Troubleshooting connectivity issues may involve checking network settings or contacting your internet service provider for assistance․
Configuring Email and Text Alerts
KE2 SmartAccess allows for proactive monitoring through email and text alerts․ Configure these notifications to receive immediate updates on critical system events, such as temperature deviations or alarm conditions․ Access the alert settings within the KE2 SmartAccess interface to customize notification preferences․
Specify recipient email addresses and phone numbers to ensure timely delivery of alerts․ Adjust alert thresholds to match your specific requirements and minimize false alarms․ Regularly verify that alert settings are accurate and functioning correctly for optimal system oversight and rapid response to potential issues․

Navigating the KE2 Controller Interface
The KE2 controller interface allows access to setpoints, variables, and manual control modes․ Access the basic setpoint menu by pressing until “tS” displays․
Accessing the Basic Setpoint Menu
To access the basic setpoint menu on your KE2 controller, repeatedly press the designated button until “tS” (temperature setpoint) is displayed on the screen․ This indicates you’ve entered the setpoint adjustment mode․ From here, you can navigate through various available setpoints using the up or down arrow buttons․
Pressing the ‘Enter’ button allows you to view the current setting for the selected setpoint․ To modify a setting, use the arrow buttons to increase or decrease the value․ Pressing and holding ‘Enter’ will confirm each setpoint change․ If you wish to exit without saving changes, simply press the designated ‘Escape’ button․
Adjusting Temperature Setpoints (tS)
Once in the basic setpoint menu (tS displayed), utilize the arrow buttons to scroll through available temperature setpoints․ Pressing ‘Enter’ displays the current value for the selected setpoint․ To change the temperature, use the arrow buttons again – this will increment or decrement the value․
For faster adjustments, press and hold the arrow buttons․ Remember to press and hold ‘Enter’ to confirm each adjusted setpoint․ The system allows you to move between digits for precise control․ If you decide against a change, simply press the ‘Escape’ button to exit without saving․
Understanding Controller Prompts (e․g․, Refrigerant Type)
During initial setup, the controller will prompt for crucial information, beginning with the ‘Refrigerant Type’․ The display initially shows ‘404’ (R-404a)․ Use the arrow buttons to navigate and select the correct refrigerant for your system․ Refer to page 12 of this manual for a comprehensive list of compatible refrigerants․
After selecting the refrigerant, press and hold ‘Enter’ for three seconds to confirm․ The final prompt asks whether to enable or disable ‘KE2 SMART ACCESS’․ Carefully consider your remote monitoring needs before making this selection․

Using the KE2 Combo Display as a Remote Interface
The KE2 Combo Display functions as a remote interface (up to 1,000 ft) providing access to setpoints, variables, and manual control modes when paired with controllers․
Displaying Room Temperature and System Status

The KE2 Combo Display offers a convenient way to monitor your refrigerated system’s performance․ The Home Page prominently displays the current room temperature, providing immediate insight into the environment being controlled․ Furthermore, it showcases the overall system status of a single Logitemp controller, or even two controllers if they have been successfully paired for integrated monitoring․
If a KE2 Combo Display is connected directly to either of the paired controllers, its status will be clearly indicated on the display as either “Local” or “Remote,” allowing for easy identification of the source of the information being presented․ This feature ensures operators can quickly understand where the data originates, streamlining troubleshooting and system management․
Accessing Setpoints, Variables, and Manual Control Modes
The KE2 Combo Display functions as a comprehensive remote interface, granting access to critical controller settings․ When connected to one or two KE2 Evap OEM controllers – up to 1,000 ft with appropriate wiring – it unlocks the ability to view and modify setpoints, essential variables, and engage manual control modes․

This remote access streamlines system adjustments, eliminating the need for direct controller interaction․ Operators can efficiently fine-tune parameters to optimize performance and respond to changing conditions․ The display provides a user-friendly interface for navigating these settings, enhancing control and simplifying maintenance procedures for refrigerated solutions․
Pairing with One or Two KE2 Evap OEM Controllers
The KE2 Combo Display offers versatile connectivity, capable of pairing with either one or two KE2 Evap OEM controllers․ This flexibility expands monitoring and control capabilities, allowing for comprehensive oversight of multiple refrigeration units from a single interface․ When paired, the Home Page displays system status for each controller․
This pairing functionality enhances operational efficiency, simplifying management of complex refrigerated systems․ The Combo Display acts as a centralized hub, providing a consolidated view of critical parameters and enabling coordinated adjustments․ Proper wiring is essential for reliable communication, ensuring seamless data transfer and control between the display and controllers․

Troubleshooting Common Issues
Common problems include connectivity issues with KE2 SmartAccess, display errors on the Combo Display, and failures in receiving alert notifications․ Review wiring and settings․
Connectivity Problems with KE2 SmartAccess
If experiencing connectivity issues with KE2 SmartAccess, first verify a stable internet connection for both the controller and the accessing device․ Ensure KE2 SmartAccess is enabled during the controller setup process․ Double-check network configurations and firewall settings, potentially blocking access․
Confirm the controller is properly communicating with the KE2 network․ If problems persist, attempt a reboot of both the controller and your internet router․ Review the KE2 SmartAccess documentation for specific troubleshooting steps related to network connectivity․ Consider checking the date and time settings on the controller, as incorrect settings can sometimes interfere with secure connections․
Display Errors on the KE2 Combo Display
If the KE2 Combo Display exhibits errors, initially verify the wiring connection to the KE2 Evap OEM controller, ensuring it’s secure and within the 1,000 ft limit․ Confirm the controller is powered on and functioning correctly․ A blank or garbled display may indicate a wiring fault or controller communication issue․
If paired with two controllers, try disconnecting one to isolate the problem․ Check for proper voltage supply to the display․ If the display shows incorrect data, verify the controller’s settings and calibration․ Refer to the manual for specific error codes and their meanings․ A factory reset of the display might resolve persistent issues․
Alert Notification Failures
If email or text alerts aren’t received, first confirm KE2 SmartAccess is enabled during controller setup and has a stable internet connection․ Verify the configured email address or phone number are correct within the KE2 SmartAccess settings․ Check your spam or junk folder for email alerts․
For text alerts, ensure your mobile carrier supports SMS notifications from the controller․ Confirm sufficient data allowance remains on your plan․ Test the alert system by manually triggering an alarm condition․ If problems persist, review the controller’s manual for troubleshooting steps and contact KE2 Therm Solutions support․
Refrigerant Selection and Compatibility
The controller prompts for Refrigerant Type, displaying 404 (R-404a) initially․ Consult page 12 of the manual for a complete refrigerant list․
Available Refrigerant Options (Refer to Page 12 of Manual)
Selecting the correct refrigerant is crucial for optimal system performance and efficiency․ The KE2 controller supports a variety of refrigerants, and proper selection ensures accurate temperature control and prevents damage to the refrigeration system․ Page 12 of this manual provides a comprehensive list of compatible refrigerants, detailing each option’s specific properties and applications․
Users should carefully review this list and choose the refrigerant that best suits their specific refrigerated solution․ Incorrect refrigerant selection can lead to reduced cooling capacity, increased energy consumption, and potential compressor failure․ Always verify compatibility before proceeding with installation or refrigerant charging․ Referencing page 12 is essential for a successful setup․
Selecting the Correct Refrigerant Type
Accurate refrigerant type selection is paramount during controller setup․ The KE2 controller prompts for refrigerant type, initially displaying 404 (R-404a)․ Utilize the < or > keys to navigate and choose the appropriate refrigerant for your system․ Always consult page 12 of this manual for a complete list of supported refrigerants and their corresponding codes․
Confirming the correct refrigerant is vital for accurate temperature readings and efficient operation․ Incorrect selection can compromise system performance and potentially cause damage․ After selecting the correct type, press and hold ENTER for three seconds to confirm your choice and proceed with the setup process․ Prioritize accuracy during this step․

Manual Revision History
This manual’s revisions are tracked with numbers like 003228 Rev․ D 2026․ Date codes, such as 2025-12-05T15:13:04, indicate update times․
Understanding Revision Numbers (e․g․, 003228 Rev․ D 2026)
Revision numbers are crucial for identifying the specific version of this KE2 remote display manual․ For example, “003228 Rev․ D 2026” provides key information․ The initial number, ‘003228’, is a unique document identifier․ ‘Rev․ D’ signifies the revision level – indicating the fourth major update to the document․
The year, ‘2026’, denotes the year the revision was released․ These identifiers ensure users are referencing the most current information regarding KE2 SmartAccess, controller setup, and troubleshooting․ Always verify the revision number to confirm compatibility with your KE2 system and to access the latest features and corrections․ Referencing older revisions may lead to inaccurate instructions․
Date Codes and Updates (e․g․, 2025-12-05T15:13:04)
Date codes, like “2025-12-05T15:13:04”, pinpoint the exact moment a specific update was implemented within the KE2 remote display manual․ This timestamp details the year, month, and day (2025-12-05), followed by the hour, minute, and second (T15:13:04) of the change․
These precise codes are vital for tracking modifications related to KE2 SmartAccess, controller interfaces, or troubleshooting procedures․ They allow KE2 Therm Solutions to manage revisions effectively and provide accurate support․ Checking this date code confirms whether you possess the latest information regarding refrigerant selection or wiring requirements․ Regularly reviewing updates ensures optimal system performance and accurate remote monitoring․
Copyright Information (KE2 Therm Solutions, Inc․)
KE2 Therm Solutions, Inc․ retains all copyrights to this KE2 remote display manual and its associated content․ Published by Refrigerated Solutions Group, this document is protected under copyright laws, ensuring exclusive rights to reproduction, distribution, and adaptation․
Unauthorized duplication or modification of this manual is strictly prohibited․ The information contained herein, regarding KE2 SmartAccess, controller setup, and troubleshooting, is proprietary to KE2 Therm Solutions, Inc․ Copyright 2020, with headquarters in Washington, Missouri 63090․ All rights reserved, safeguarding the integrity of the KE2 system and its remote monitoring capabilities․